Blackmagic Design have just released the 4K version of their venerable Intensity Pro PCI card for edit systems. Intended to add a full screen monitor to edit systems as well as a capture tool to input pretty much anything you can throw at it. Also included in the box is a copy of DaVinci Resolve lite, the company’s colour grading software which has developed into a pretty good editing tool as well.
The PCI card works with Windows, Mac and Linux but my system is a purpose built PC tower that already contained the old Intensity card which was good until I added a 4K monitor. The first thing I noticed about the new card was the addition of a small fan (more of this later) and the second was the larger PCI connector. The original Intensity fits in a 1-lane slot, the 4K version requires a minimum of 4-lanes. Fortunately I had a spare 16-lane slot but I now cannot add a second graphics card to my Asus P9X79 motherboard.
Before installing I had already upgraded to the latest Blackmagic Design Desktop Video (v 10.3.7) so when I installed the card the system booted and installed the card drivers and nothing else was required. I have the full version of DaVinci Resolve so did not have to install the supplied lite version.
Opening up DaVinci and a few changes were needed to set the system up. I am using two 1920×1080 AOC monitors as a dual screen GUI and plugged the HDMI out from the Intensity Pro 4K to a 4K Samsung monitor. In DaVinci in the View menu I switched on Dual Screen and then setup my displays. Because the 4K screen is also connected by a Displayport (making it Display 1) on the graphics card my layout is like this:
The primary display in DaVinci is the one with the menu bar on it which is traditionally the left hand monitor, but coming from an Avid background I prefer to have my edit screens on the right and since the layout is fixed in DaVinci I put this on the right so it is Display 3. Secondary display is Display 2.
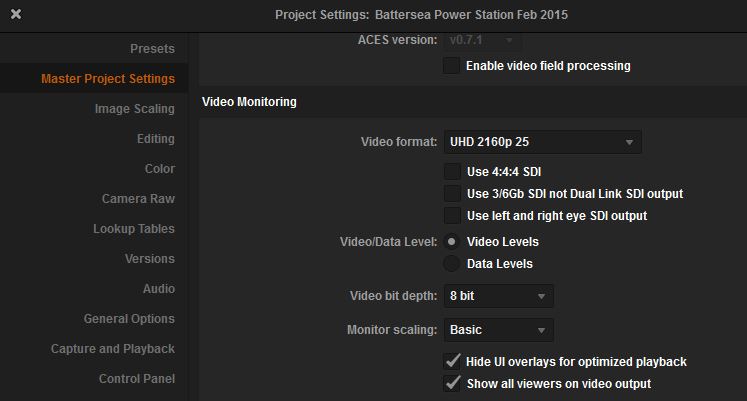
The next stage is to get the right picture output to the 4K monitor. Open up the project settings using the cog icon at the bottom left of the primary screen and pick the Master Project Setting option. Set the video format to UHD 2160p 25 (or what framerate you use). Video/data Level and bit-depth settings depend on the monitor you are using. Choose video levels if your monitor is calibrated to Rec. 709 or Data Levels if your monitor is capable of displaying “full range” video signals and you monitor 10-bit signals. My monitor is a basic unit so my settings are this:
Remember that these are Project settings so they can vary between projects and you can switch between 4K and HD.
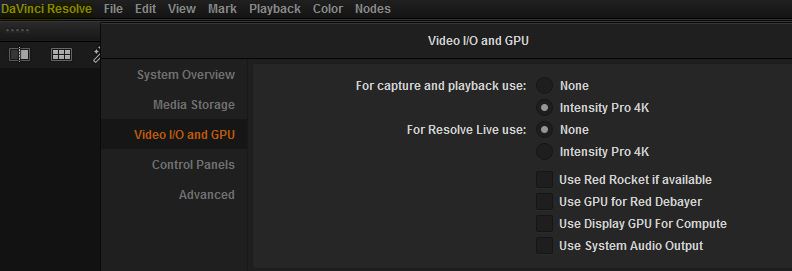
You should now see a picture on the client monitor in glorious 4K (well UHD). If not the settings in the DaVinci preferences might be wrong. Click on the word “DaVinci Resolve” in the menu bar and select Video I/O and GPU on the left. You should see the options for Intensity Pro 4K are selected both “For capture and playback use” and “For Resolve Live use”. You can un-select “For Resolve Live use” as this is only for monitoring a live camera input. If you have two (or more) GPU’s installed tick the “Use Display GPU for Compute” option to share the GPU’s power. Note that Resolve Lite users are restricted to the use of a single GPU unless using a 2013 or later Mac Pro. If you DON’T want to use the audio output of the Intensity Pro 4K card and use the computer system’s audio output then tick the “Use System Audio Output ” option. You have to restart DaVinci to apply the changes.
Some notes about playback speed. I am using a NVIDIA GTX 780 6GB (yes the 6GB version – highly recommended) and the system has 32GB RAM and 4K material plays back RAW 4K content (from a BM camera) at around 15 fps but with noise reduction and sharpening and a couple of extra nodes this reduces to 7fps. RAW 4K is probably the hardest source that you can throw at an edit system so I am impressed that mine can handle it this well. Compressed footage plays back at 25fps unless noise reduction is applied, when it drops to 15fps. Remember that the Lite version does not have noise reduction. The source material came from a striped G-Tech drive connected by e-sata.
And that fan on the new card. Well it is noticeable. It is at a different pitch to the computer’s fans so I heard it straight away and it is louder than I would expect. Depending on the work you are doing and where the computer is located this might be a problem, but I have got used to it fairly quickly.
Hope this information helps those who want to set up a low cost but efficient DaVinci Resolve 4K system using the new Blackmagic Intensity Pro 4K card. The card also displays 4K from After Effects well and I presume on Premiere too.
If you are looking for more help about DaVinci Resolve then join the DaVinci Resolve Users Group on Facebook where over 2,000 users share ideas, experience and help. Also please follow me on Twitter @TimelapseLondon


